
AMT International Scout II build
Tags: mokei amt international-harvester car
I haven’t thrown together an American-made car model since I was a kid. Back then, I didn’t have the luxury of airbrushes, or the most important tool of all: patience. This “retro” kit tested both my painting and modelling skills in a bigger way than I thought it would!
The kit
This kit is an AMT International Scout II that I got from my local hobby store. The box claims that it is a retro re-release, which I hoped didn’t mean worn-out tooling. I love the Scout II; it’s a much less bourgeois vehicle than the other trucks of its generation, which have all become show vehicles that are impossible to obtain.
Please don’t email me with how much a Scout II costs in your local market. I know.
Like I said earlier, this is a kit that will need painting. I had very low success painting kits as a kid, mostly because I’d get impatient or have nasty brushstrokes. Now I had the power of air on my side!
To get started, I opened the box and found out that the chassis/interior part is all one part, moulded in bright yellow, like the body. This is actually pretty good for me, since it will be obvious where I missed painting it. After washing it in dish soap and water, I decided to paint the whole thing in Mr. Hobby Aqueous flat black. There really aren’t many parts in this kit, so I was excited to have a good testbed that wouldn’t land me in eternal glue hell.
I don’t know if it’s weird to say so, but the plastic baggies that contain the sprues and stickers feel really good. Whoever bought those bags at AMT did a good job.
Painting-wise, this time around, I had done a little bit of prep the previous summer. That prep mostly consisted of buying tools and paint to make sure that things would go better for me. On impulse, I bought a $5 cookie tray from Canadian Tire, so small parts and tools wouldn’t have to be precariously balanced on a piece of cardboard. That turned out to be a great investment.
Bathtub
I decided to flat black the entire bathtub, inside and out. The floor of the Scout doesn’t have a lot of detail except for the automatic brake and throttle pedals, which you cannot really see in this picture. In fact, I didn’t even notice they were there until I started painting!
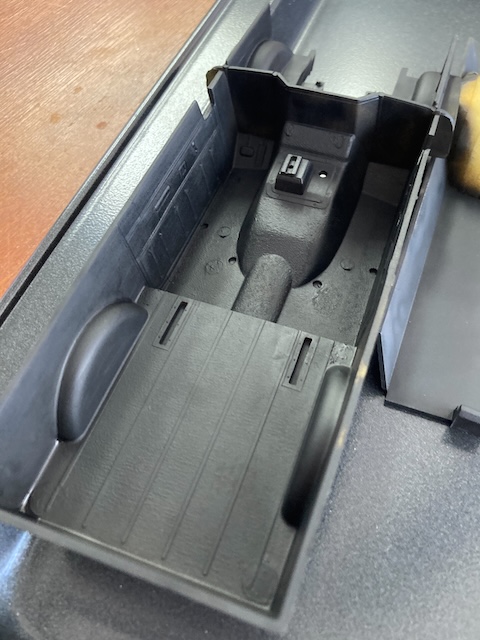
I’m pretty happy with how it came out. There’s lots of injection marks and other tooling marks on the original plastic, but it’s hard to sand those out without damaging the textured floor. I think it would be cool to get rid of those marks and then fabricate a little carpet or bedliner texture, but let’s try to stick to one new technique per model. It’s a truck. Trucks do truck stuff.
The lack of colour is not a big deal, as the interior is mostly occluded by the bucket seats and dashboard, which I planned to paint some lighter shade so it would be legible when looking in through the windows.
I had some challenges at this early stage. One was that I didn’t mix my paint properly, so I ended up with either little thin spackles or big wads of shot. Luckily, the flat black is pretty forgiving, and I got better as I put successive bits of paint through.
As the compressor heated up, it also seemed to be having trouble making pressure. After about 30 minutes of use, I had to start adding a beat or two of delay from when I went from “just air” to “air and paint” on the trigger, because it would seem initially to have nothing coming out before I got a shotgun blast. Chances are I am pushing this el-cheapo Amazon nail-art compressor a little bit too hard. It’s also likely that I’m clogging the brush, and need to be more disciplined with stopping the flow of paint before stopping the air.
After all this outdoor-painting nonsense, I decided to move indoors. You’ve already seen some of the results of me keeping the airbrush indoors, and the rest of this kit was all done in the comfort of my very own home.
Underbody
Although this is a simple kit with very few parts, there’s a handful of suspension details to work out here when painting. I flat-blacked most of the parts, being careful to pay attention to what would be visible when the parts were installed.
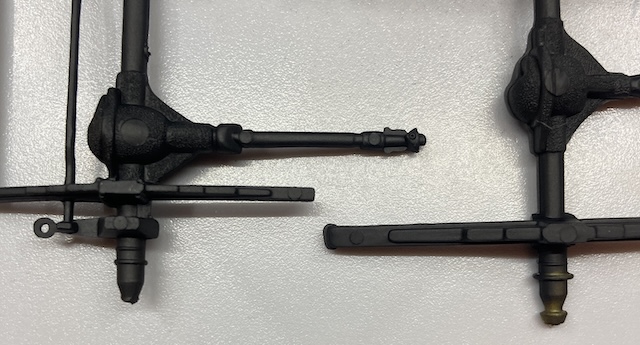
I’m going to complain a lot about the worn-out “retro” tooling on this kit, but it was mostly not a showstopper except for here. The moulding on the wheel mounting stubs on the front differential/axle had melted into the sprue, so I was not able to get a nice clean separation as the manual indicates. I had to end up fabricating my own stubs on the front by gluing on bits of sprue that I thought used to be the wheel hubs. The wheels went on what was left of the axle stubs without those nubbins, but they didn’t stay on or roll.
Being moulded in yellow definitely helped me to figure out where there were thin or missing paint spots. Using the paint booth made knocking out all these underside suspension parts super easy. I particularly enjoyed how the gas tank came out.
I debated doing these parts in gloss black, as I was worried they would disappear into the flat black underbody, but they seem to have come out OK. I think the visual contrast of the exhaust system helps highlight the change in depth.
All of the exhaust system got a nice spray of Tamiya silver. How nicely metallics come out of the airbrush surprised me. When I was a kid, anything silver was always an opportunity for brush strokes and uneven coating to ruin my project. Not so here!
Engine
Again, the tooling on the engine/transmission and all of its various parts seems to be really worn out. Not only are the alignment pegs tiny, they don’t really do anything to align. The intake manifold has pegs but they don’t go into anything on the block!
I had to use tape to hold things in place during the gluing of the short block, and there is still a very visible gap in the join line from the bottom.
Following the instructions, I decided to do the engine block and non-chrome accessories (intake manifold, front cover, transfer case, automatic transmission) in gloss red. Rejecting the instructions, I painted the belt drive, the exhaust headers, and the front fan separately, of course. Belts shouldn’t be red.
I ended up using Tamiya X-7 “red,” which went on nicely but made it look a bit toylike. I applied a little bit of panel liner here and there to draw out some of the detail, but since it’s my first time, I’m not sure I did anything other than make it look dirty.
Figuring out how to clamp up the engine/transmission/transfer case for painting was the hardest part. Because the part is long and awkward, all the traditional grabbing spots (top of the intake manifold etc) make it wobble around under air pressure, so I had to settle for somewhere that would obscure some paint initially and require me to move the clamp around (without destroying the still-wet paint.)
I started by using an alligator clip on the oil filter, and then eventually moved to the rear output shaft of the transfer case after painting that part and letting it dry for a bit. It’s hard to know when it’s dried enough to be safe to move it, and I fear that I rushed it still.
I was having some trouble with the quick-set Tamiya extra-thin, which I used on most of my previous projects, stripping the paint. I switched to gel super glue because that’s what I had on hand, but I’m going to see if I can get some of the fancy Bob Smith stuff from KMS Tools.
The valve covers were a surprise. They attach to the block using little pegs. On the passenger side, I had to hog out one of the holes in the block with a knife in order to make it big enough for that valve cover to mount.
On the driver side, they simply didn’t drill enough holes for the valve cover. While the passenger valve cover had 2 studs and 2 holes, the driver side valve cover had 3 studs and only 2 holes.
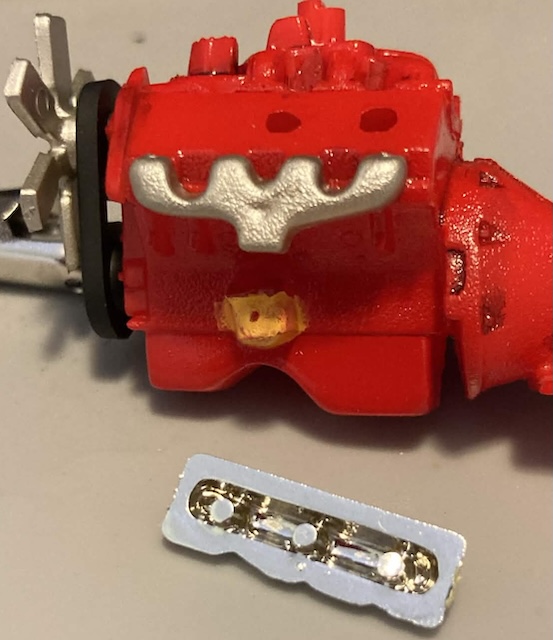
I’m not sure if they just screwed up moulding this, or there was a change made to make it “easier” and they forgot to update the chrome-parts tree, but this made me pretty grumpy. I clipped the last stud off and loosely positioned it. The remaining holes were already out of spec enough that it cured just a little bit crooked, but I think overall it’s a nice looking engine.
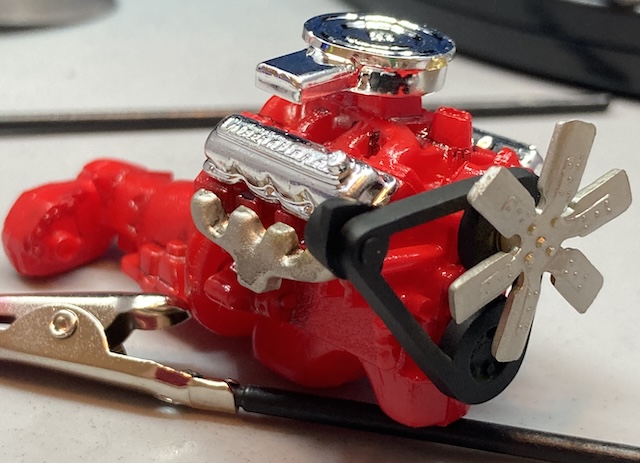
Masking and painting the alternator was clearly too much work, just like it was apparently too much work for AMT to make a mounting bracket to hold it to the front matter of the engine.
Isn’t it weird that the cooling fan on the Scout’s IH 345 V8 comes off the camshaft? Maybe it’s just weird to me.
Interior
Because it says so on the label, I decided to paint the seats and dashboard the Mr. Hobby Aqueous H58 “Interior Green.” From the jar, it looks like a nice, opaque avocado colour, perfect for a machine with one foot in the 70s.
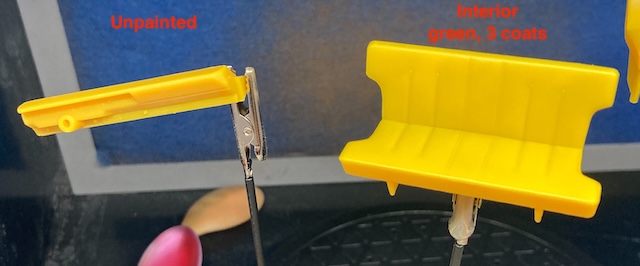
Unfortunately, it’s not as opaque as I thought, and it’s nearly impossible to see a difference between the interior green, and the base yellow colour of the AMT plastic. Whoops! This needed to be primed.
I repainted these in the Golden high-flow “Titanium White,” because it seemed like it would be easier than mixing up some Tamiya white. This is my first time using these supposedly pre-thinned Golden paints, so I was curious how it would work. Everything seemed to go well, although it was a lot more difficult to clean out of the cup of the airbrush than other paints. Some flecks also seemed to “dry” in mid-air and stick to the work, but in this case the additional texture was welcome. It was left to cure for a day before I tried to top coat it again with the Interior Green.
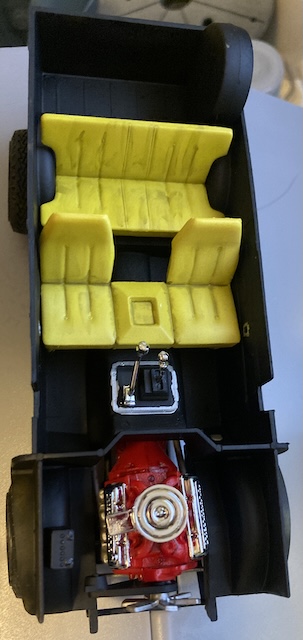
That seems to have gone well, although I think the Interior Green is a lot brighter backed with white than I originally wanted. Probably the right thing to do here would have been a light matte grey mid-coat. Instead, I gunked some black panel liner on there until the seats looked grubby.
I touched up some interior parts with a silver Sharpie, like the pedals and the door latches. I made a bit of a mess freehanding it around the tight confines of the transmission tunnel bracket, but it’s probably fine.
Installing the suspension
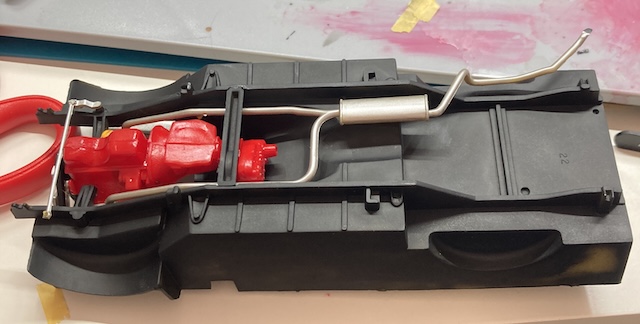
At this point I had to repaint the transmission crossmember, because I painted the wrong side of it. From now on, I’m just going to paint both halves of any part that small. Luckily, the transmission crossmember fit without trimming, so my guess at how to clock the transfer case was at least in the ballpark.
This guess was not super great in the end, as the front and rear driveshafts didn’t line up with the transfer case super well. This ended up pushing the front and rear axles around, which meant some frustrating gluing for the suspension pickup points. Defying the instructions and installing the crossmember first, so that you have a solid reference for the entire engine/transmission and transfer case, is probably a better way to go. Ah well, the truck stays up under its own weight.
Front axle fix
It was now time to put the wheels together and put them on the car. Although I don’t particularly think the chrome looks good on this thing, I didn’t want to go through the process of learning how to strip chrome on this car. I’ve learned enough already here. That’ll be a future model’s project.
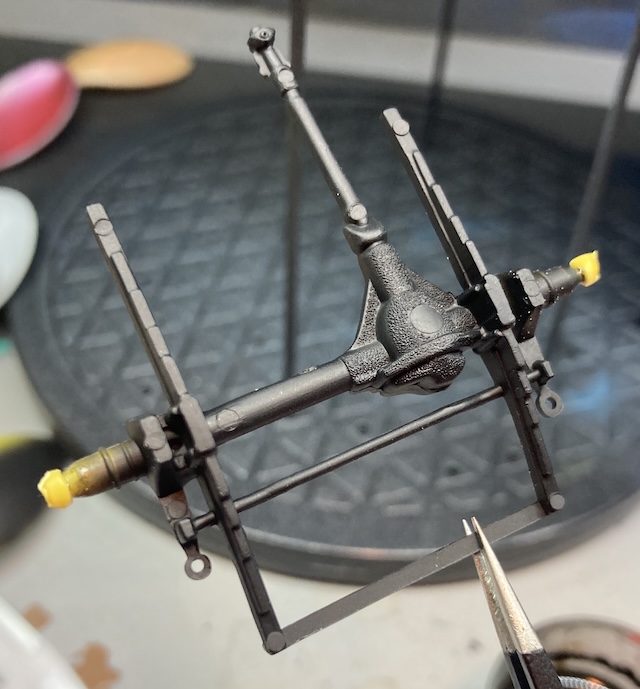
As previously mentioned, the tooling had obliterated both nubs that hold on the front wheels. In order to hang the wheels off the front axle, I needed to fabricate and install another wheel-retaining nub.
I looked at the surviving nubs on the rear axle and rough-cut a piece of sprue to look about the same, then affixed it with CA glue and a little bit of Tamiya extra thin to make it flow together. Being an amateur to gluing of all kinds, I was not reassured that this would make a strong enough joint, but I decided to try it anyway.
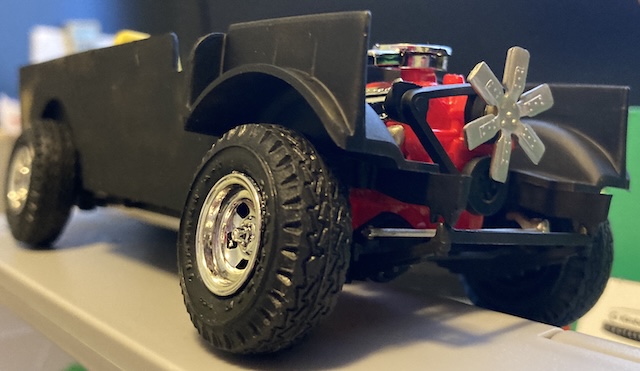
The wheels stayed on, but the right front wheel is pretty wobbly. That’s not too much of a surprise, as I’m pretty sure the axle is longer on that side, so the pin isn’t holding it tight against the inner “bushing” surface. I’m just happy the wheel didn’t instantly fall off.
Finally, the body
There was a lot of prep for the body. First, I test fit it to make sure that there was nothing egregiously wrong. If I had a real problem at this point, the best thing to do would be to move into the woods and never return.
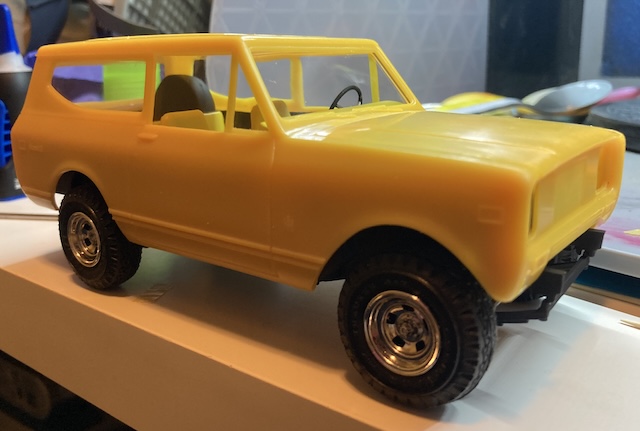
Whoa, hey! It’s a truck. I wish this thing didn’t have moulded-in windshield wipers, but I understand that’s a common complaint with AMT kits.
After that, I moved around with my trusty Olfa knife, smoothing hard edges, cutting off flash, and removing part lines. There was a pretty nasty one of the latter near the passenger-side tail light. That part line absolutely would have shown up as soon as it got into primer. As it stood, I wasn’t sure that there weren’t going to be more obvious ones emerging still, but that’s the primer’s problem. I hedged my bets by meticulously going around the edges and using my fingernail to feel for any catches.
Because of lack of options on hand, I decided to prime with pink Surfacer 1500. As the Mr. Hobby products contain 2-butoxyethanol solvent in excess of Industry Canada regulations, they were banned from import. This situation has continued for awhile now. As a result, all of the local hobby stores have run out. This pink Surfacer managed to come from a little figurine store in my local Chinatown that hasn’t sold through their inventory yet. It made a big difference behind the orange on the Honda Z, but I expected the green to be opaque enough that you’d barely even notice it.
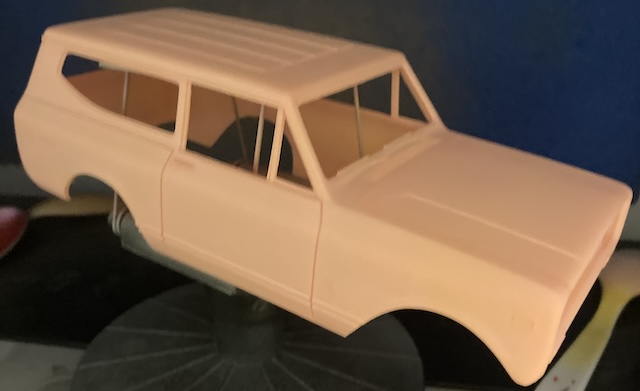
I think the priming came out fine: many fewer obvious flaws jumped out than did with the Arii. This is probably because I spent so much time processing the body. It laid down fairly smoothly.
This time, I decided to reach for a new airbrush: an Eastwood side-cup1 that I’d had lying around in my car parts pile. I don’t remember when I bought this, or why, but it has to have been at least 15 years ago. I was curious if it would be demonstrably different from my cheapo Gocheer. For the most part, it wasn’t: but it’s a lot easier to clean, the action is smoother, and there’s a limiting screw on the back. So I’ll stick with this one for a little while, and probably relegate the Gocheer to “metallics duty.”
I wanted to use a metallic green colour, but upon further inspection, it turned out that my metallic green is Mr. Hobby Acrysion – which can’t be painted on top of acrylics such as the pink surfacer that I just put down. So I switched to Tamiya XF-4 “Yellow Green,” which I think gives it sort of an unripe banana vibe. Perfect for the 70s.
Achieving an even coat with yellows has been tricky for me in the past. Here there is still some unevenness, but it’s hard to see with the eye. The paint also laid down fairly roughly, which I think hurts the gloss in the long run. I should have done more (any?) sanding.
Because of some recent nightmares where Tamiya masking tape was pulling paint off of the surface, I decided to quickly clear coat the body before moving on. I grabbed a little jar of Tamiya semi-gloss clear and mixed it in a 1:2 ratio, which seemed to lay out fairly well. For this intermediate phase, I gave it two coats, mostly because I ran out of clear at that point. Then I let it cure for 24 hours before sticking the tape on it for any detail painting.
Detail painting
For the grille, I globbed on some black panel liner and hoped that it would stick around long enough to give some contrast. Hooray, it did! I thought about simply giving it a wash with black acrylic paint, but I didn’t want to get my brush out for that.
Actually gluing the grille on was harder. I first put a generous glob of glue on the ejector pegs, but then it fell off and left glue gunk all over my bumper area. To fix that, I ended up gluing the grille onto the body from the inside of the headlight buckets.
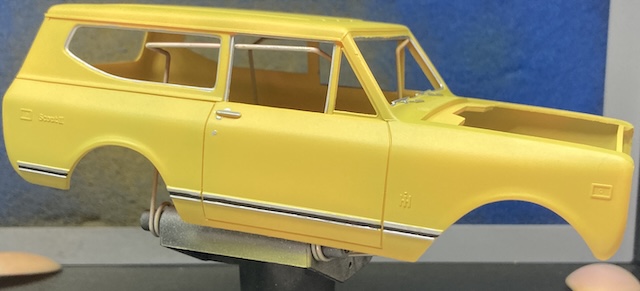
The side trim came out nicely. I did it by first filling the inner area with my AK rubber black pen, then hitting the high spots with a silver Sharpie. It looked a bit uneven at first, so I gave it another “coat,” and now it looks alright to my eye. The window trim was so-so, and I accidentally made too much of the drivers’ side trim silver. At this point, I was in “moving on” mode, so we kept going.
I was excited to do the waterslides, and even more excited to find they slid off the paper super easily compared to my last waterslide ordeal. New decals make a difference! Unfortunately, all of them tore and fell apart while I was manipulating them, so I ended up having to colour in the side badges using a Sharpie – to varying effect.
Final assembly
I glued in the windshield and the tail lights using clear Elmer’s glue, and then let it sit for a really, really long time. Let glue dry.
For the bumpers, I knew from the grille that I would have trouble getting chrome things to stick to the frame. So, I did a test fit, and then scraped the chrome plating off of the mating section of the bumper using my craft knife. At first, I thought the pegs on the bumper might be how it mounts, but they appear to be nothing more than ejection pins, as the frame doesn’t line up with them.
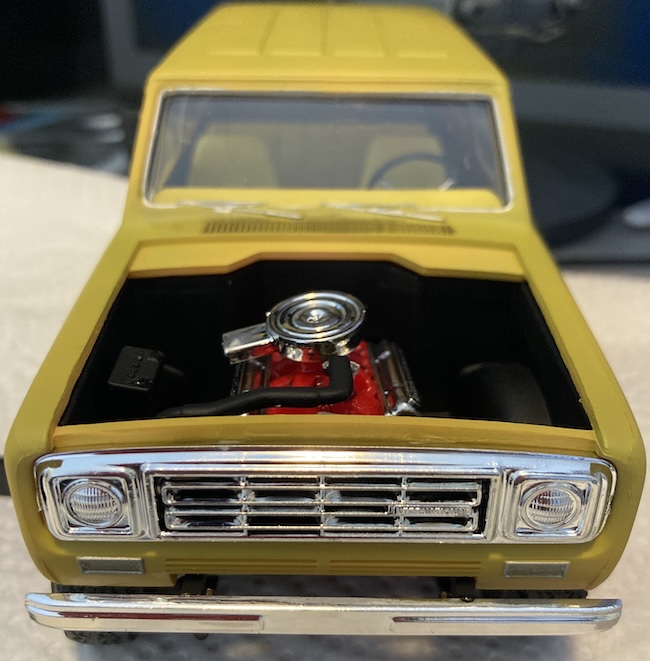
Putting the upper radiator hose in took some patience, as both the pin on the hose and the hole on the engine block were not well-formed for each other. After some struggle, I was able to prop it in place with my thumb for long enough for the glue to tack up.
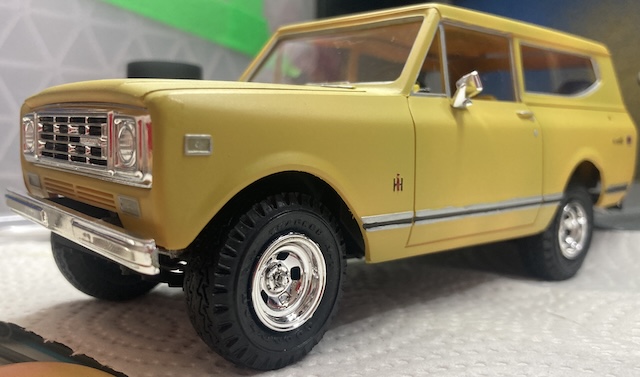
I had heard from other people who built the same kit that the wing mirrors were a pain. There’s a just barely-visible section on the doors that you can mount the mirrors to. Unfortunately, the mirrors are not in the best shape coming off of the runner, nor do they have an unambiguous flat mating surface. I sanded off the chrome from one face of it and hoped for the best. Although these mirrors are pretty wonky, they actually look okay if you don’t think about it too hard.
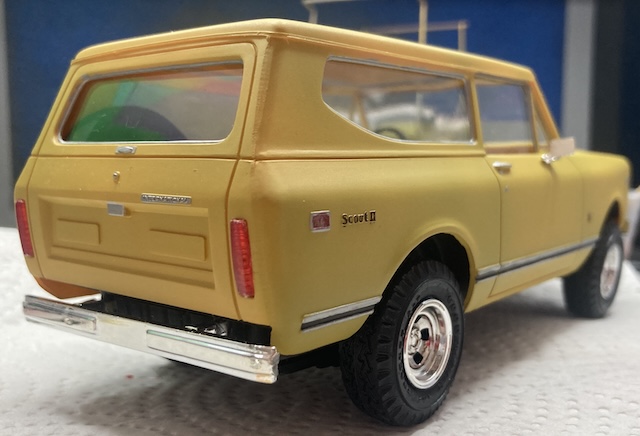
Complete!
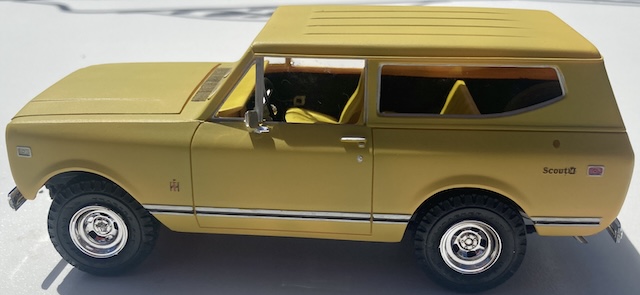
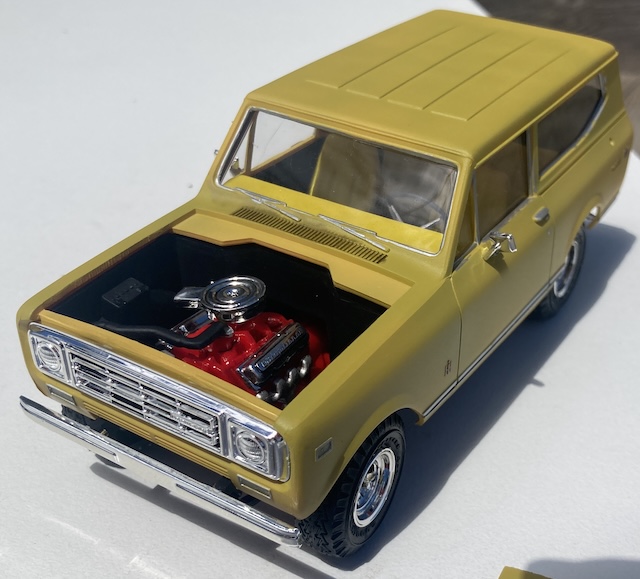
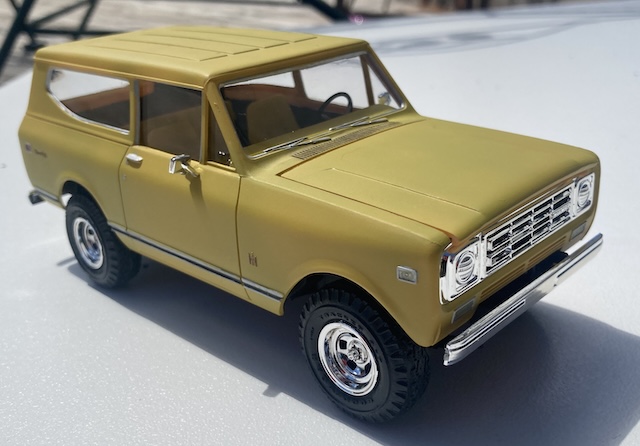
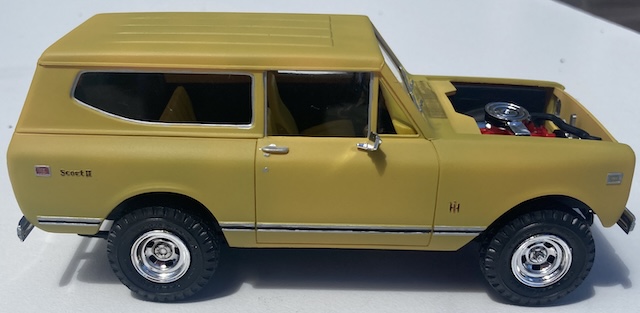
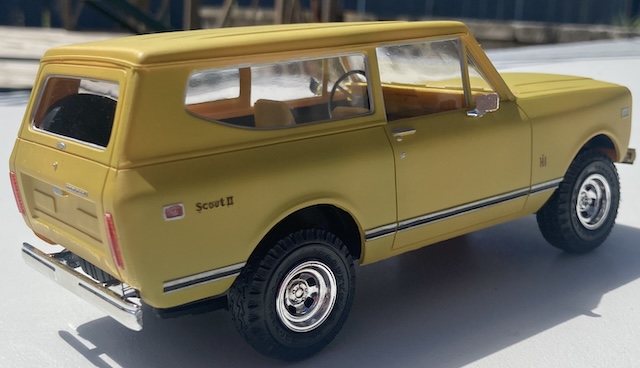
Despite all the obstacles, I really do like how this kit turned out. I keep looking at it on the display shelf and thinking about going on an off-road adventure.
Building it taught me a lot about dealing with flash, mis-moulds, and other weird aspects of old American kits. I really liked how I could detail the “tub” to varying degrees depending on how brave I felt; you could tinker with this forever.
It would have been nicer to have shinier paint – maybe I needed more coats of clear coat, or just to get closer to the work. I’m also not a huge fan of how the side moulding came out, although it looks good from a distance.
On my next kit, I plan to spend some more time processing the body, and maybe even use putty to get rid of some of the sink marks and flaws.
Although I couldn’t source the right surfacer this time, I also would make the interior much more opaque: I think black on the inside would have made a difference to how the light shows up around the door seams. When the truck is sitting in the sun, you can see light glowing through the thin plastic of the C-pillar.
Keeping with the opinions of the internet majority, I would also probably strip the chrome and repaint it. For detail purposes, it would also be really cool to have 1/24-scale “stuff” to put in the trunk, like a little Haynes repair manual or some empty coolant jugs.
I’m looking forward to building up more of my skills on the next kit. Thanks for reading!
-
Update: I found a piece of paper in the original package that shows it to be a common “HS-32” airbrush. Since there is no branding, I suspect this is a clone of someone else’s design. I am thankful that the paper also included an exploded parts diagram so I could clean it. ↩